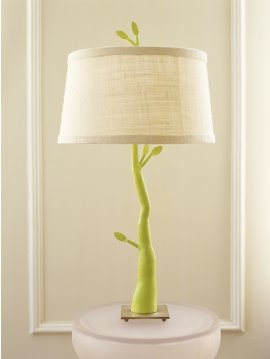
"Growth" lighting
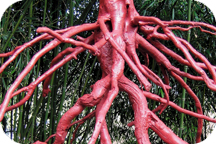
 These incredible lamps are by Christopher Poehlmann. Made of aluminum and can be made with three to up to 10 bulbs, each piece is custom made. See more here.
posted by jon at 8:36 AM
![]()
![]()
Dedicated to all things faux bois (fake wood) Thanks for stopping by!
These incredible lamps are by Christopher Poehlmann. Made of aluminum and can be made with three to up to 10 bulbs, each piece is custom made. See more here.
posted by jon at 8:36 AM
![]()
![]()
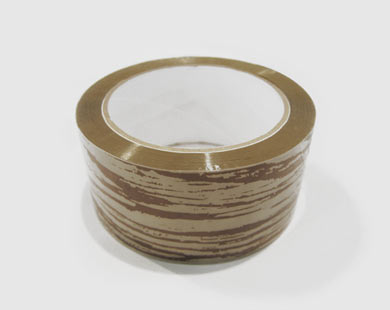 Continuing our from our "dovetail" tape post last week, Jennifer tipped us off that Atypyk also has wood tape! FINALLY someone else has it! (thanks Jennifer!!)
posted by jon at 8:47 AM
![]()
![]()
 Happy Memorial Day!
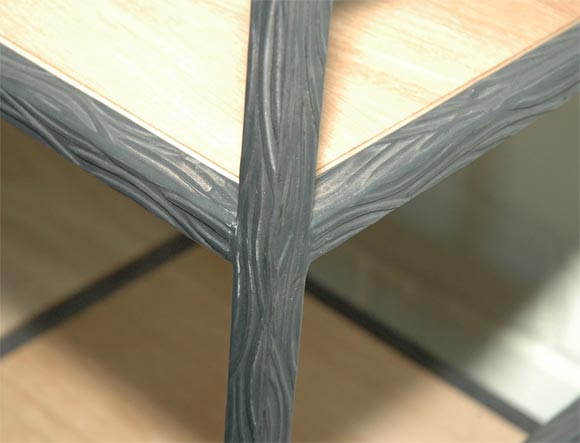 I love the subtle detailing! (thanks Alec!)
posted by jon at 12:04 AM
![]()
![]()
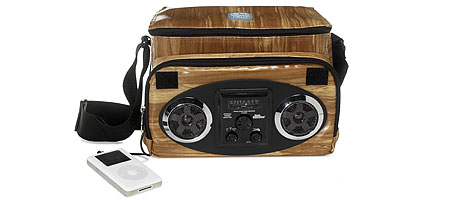 We posted about the woody ipod player awhile ago, but the people at Lifepod have come up with a deluxe model that also doubles as a cooler. (And you can still hook your ipod to it!) Perfect for this Memorial Day weekend, or your next outdoor shindig. Get one here.
posted by jon at 8:46 AM
![]()
![]()
 Happy Friday! Today we bring you a true necessity for those that long for the authentic rustic cabin/lodge look. And look how the clock could double as a moon or sun! This Eagle clock is also made of alabastrite. What is alabastrite? Alabastrite is a stone-based material that can be molded and painted. See, you learned something new this friday! Have a good one....
posted by jon at 6:06 AM
![]()
![]()
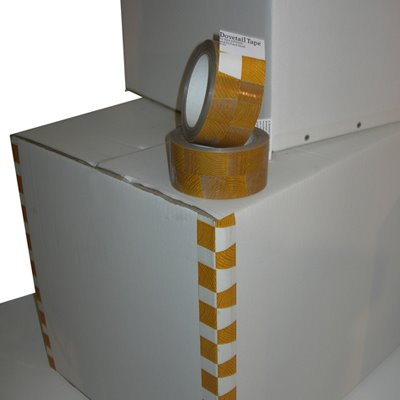 We can't believe we haven't posted about this yet, as we know it's been featured in the blogosphere since last year. Similar to the tape that we found in Japan, this one by Richard Shed has a bit more humor to it- the "dovetail" is a common term for a woodworking technique used to join two pieces, usually a sign of good quality. This tape allows you to add instant "credibility" in a more tongue in cheek way.. Created for an exhibition, these tapes were limited edition, (in other words, probably not readily available anymore) but check out the other fun and clever designs on the website.
posted by jon at 11:22 PM
![]()
![]()
 We can always count on the guys at Fred Flare to provide fun items to make us happy. As part of Fred Flare's Next big thing- check out this cute pink woodgrain clutch- from Camp Apparel.
 There is also a brown faux wood pouch available at Camp Apparel's website!
posted by jon at 10:11 AM
![]()
![]()
 Blog friend and fellow woodnut Karina at fototiller, tipped us on this cute "jollywood" bib by Pink Francis. Available at Plastica. (thanks Karina!)
posted by jon at 5:20 AM
![]()
![]()
 Fellow woodnut Andree reminded us to check out the latest at Viva Terra- Love these twig flower holders by Roost!
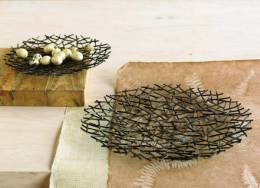 and more classics from faux bois master Michael Aram, whom we've mentioned before, this thatched platter and bowl. (thanks Andree!)
posted by jon at 7:40 AM
![]()
![]()
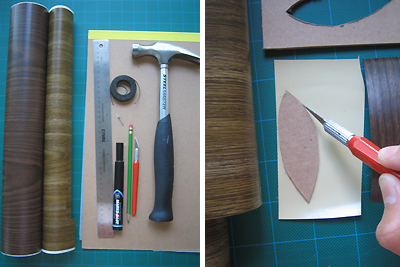 These are the things I used: contact paper, the back of my drawing pad for cardboard, a black marker, a nail, a hammer, an x-acto knife, a steel ruler, a pencil, and strong string for the necklace part.
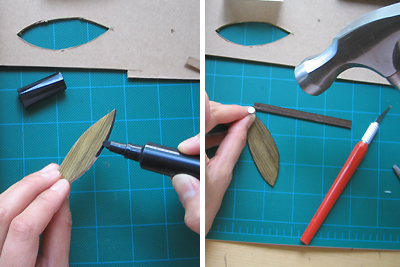 This is how I did it: (1.) Using my x-acto knife, I first cut my shapes out of the cardboard. I used the steel ruler for straight edges. (2.) I covered top and bottom surfaces of my cut out pieces with contact paper, (3.) and then markered in the sides with black to give it a finished look. (4.) I then used a hammer and nail to bust a hole through for the string.
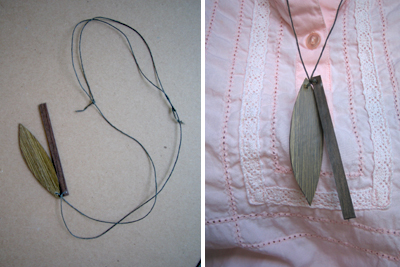 (5.) Last, I strung up the necklace by securing the cut outs in the exact middle of the string and then made the necklace adjustable with each string end tied to the opposite string end (hopefully, it will help to see the picture.)
Took some time to figure out, but after doing it again, it was like a 30 minute meal with Rachel Ray! I think I'm going to try earings next time....
posted by Anonymous at 6:48 PM
![]()
![]()

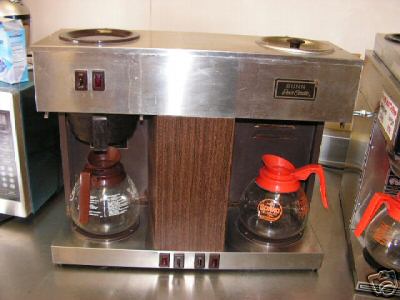
 Yet another SBIG Friday! Oh there's a ton of goodies on ebay right now- So ya better act fast! We're particularily fascinated with these vintage industrial coffee makers. If you have a diner/restaurant/cafe or you've been itching to get that "bad 70's diner truckstop with Flo yer waitress" vibe, one of these hot little numbers would surely do the trick- Hurry! Place your Bid now! find some here, here, and here.... have a great friday!!
posted by jon at 8:24 AM
![]()
![]()
 Doesn't everyone need an industrial strength metal woodgrain trashcan? This fancy number won't puncture, is fire-safe, is of heavy duty steel construction, and will not burn, melt, or emit toxic fumes... Grrr... woodgrain is strong!... i'm not sure why it costs so much- but... you can get it here.
posted by jon at 8:24 AM
![]()
![]()


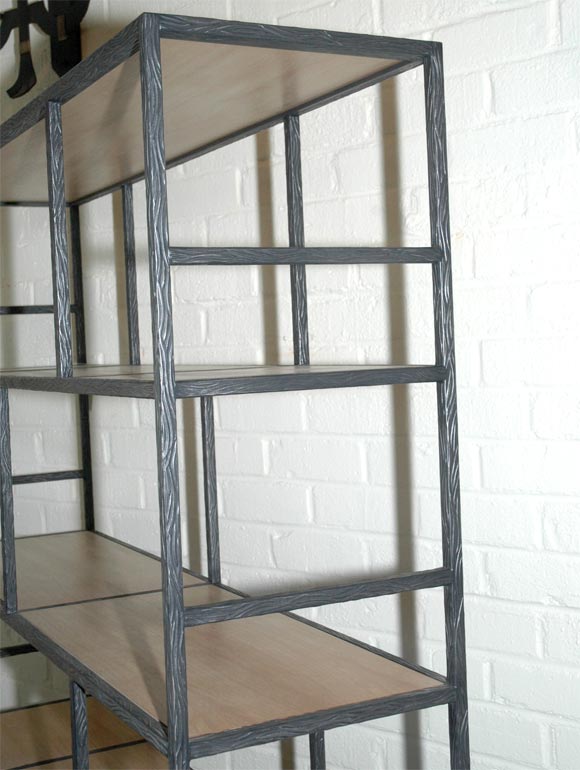
 Blog friend and fellow woodnut Alec, over at Apartment Therapy LA, tipped us off on some of the recent faux bois going on over at Janus et Cie. The concrete outdoor pieces are simply gorgeous and artfully crafted. Look under "cafe Janus" and then under "faux bois." (thanks Alec!!)
posted by jon at 12:14 PM
![]()
![]()
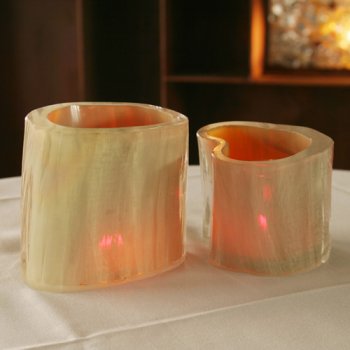 These "Stump" votives are by Portland based Esque Design. I love how they seem warm but cool at the same time. Available here.
posted by jon at 10:21 AM
![]()
![]()
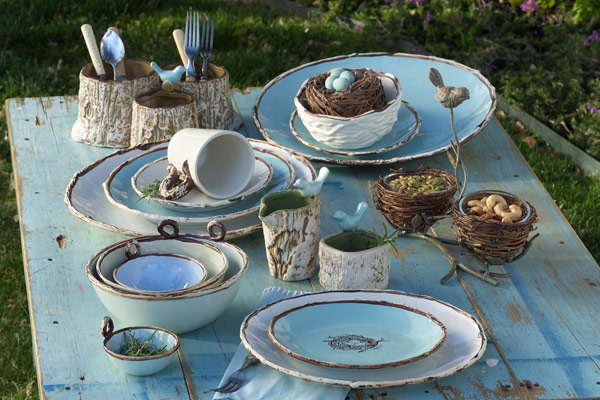 Blog pal and fellow woodnut Holly over at Decor8 found this great set of faux bois dinnerware for us at Room Service Home. We love the light blue insides! (thanks Holly!)
posted by jon at 7:10 PM
![]()
![]()
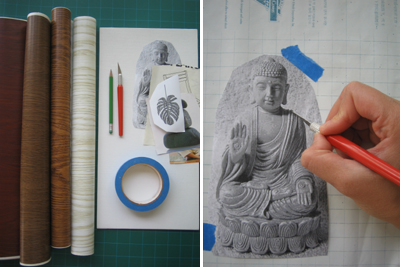 These were my supplies: woodgrain contact paper, an xacto knife + cutting surface, a canvas board or just cardboard, selection of interesting magazine cut outs, pencil, and some tape.
 This is how I did it: (1.) I laid my contact paper backside up and taped down my cutouts. (2.) Using my x-acto knife, I cut out my shapes and taddah.. stickers! (3.)To make the collage portion, I added a horizon line using my lightest and darkest contact paper and then laid down the rest. After a few layouts, I found this one and commited by stickin' it down. There are so many variations to supplies and trouble shooting so please feel free to contact us with any questions.
I might need to meditate a little bit more on buddah in the summer scene, maybe a few more falling philodendron, but there you have it - sticker art! Click here for a few more samples.
posted by Anonymous at 5:27 PM
![]()
![]()
posted by jon at 10:51 AM
![]()
![]()
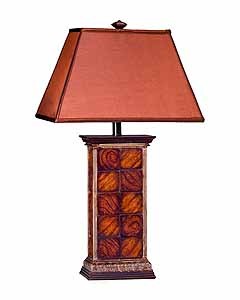 (happy friday!) Let it be known that I actually like parquet tiled floors. I know its typically a cheezy retro throwback, but I feel there's a certain charm to it. I also love lamps. But that doesn't mean I think that the two should be put together... hence today's So Bad It's Good item. I'm still a little on the fence on this piece, as the fact that they not only put "parquet" tiles on it, but also that they're made of ceramic kind of fascinates me... However, the extra added crown moulding on the top and bottom sort of push me over to the darkside, and perhaps give this piece a bit toooo much..."class" for my tastes? At any rate, it just so happens to be on sale! (I wonder why?) You can get your fill of ceramic parquet tile lamps... right here.
posted by jon at 6:22 AM
![]()
![]()
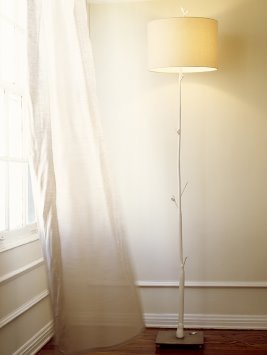
 We realize these have been posted in several blogs before, but we just saw these again recently and realized we've never actually posted them here before. (shocking!) So... with an official its(k)notwood introduction, we give you these amazing faux bois "twiggy" table and floor lamps. Brought to you via Moth Design.
posted by jon at 3:27 PM
![]()
![]()
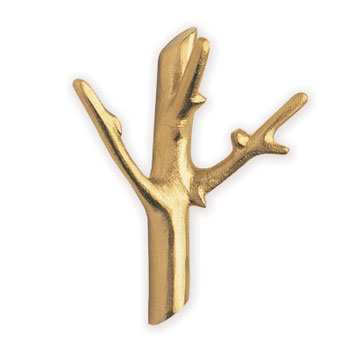
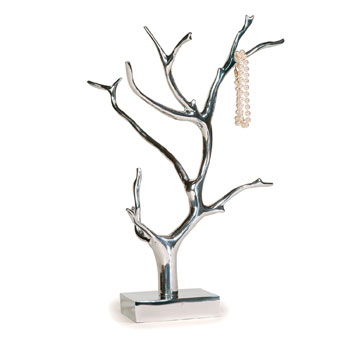 Wrapables has some fun faux bois for spring/summer right now. We love this "Manzanita" silver jewelry tree and bronze twig hook!
posted by jon at 6:27 AM
![]()
![]()
posted by Anonymous at 1:15 AM
![]()
![]()
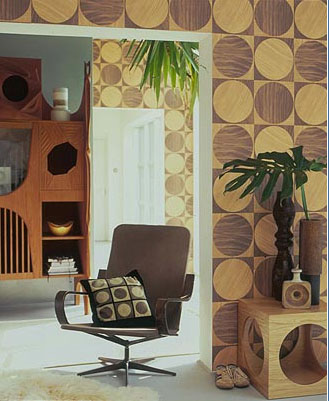

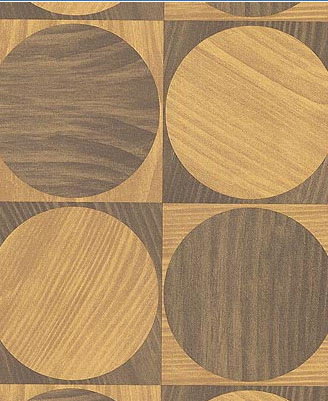 More woodgrain wallpaper! This time we have a more "op art" version from designers Wayne and Gerardine Hemingway, for Graham & Brown. We think a bit much for an entire room, but how striking would it be for an accent wall?!....
posted by jon at 3:31 PM
![]()
![]()
 Super thanks to Jennifer Barger at the Washington Post Express for including Its(k)notwood in her piece about faux bois! You can download the pdf file of last friday's issue here and we're on page 52 (or section E4) (thanks Jennifer!)
posted by jon at 10:42 PM
![]()
![]()

 Aye Carumba- what beauty- this delicious "kim"lantern- pricey but so yummy. The branch part is cast brass. This is part of the Bill Sofield collection at Baker. Also seen in the collection is this lovely "arbor" floor lamp.
posted by jon at 10:36 AM
![]()
![]()

posted by jon at 8:12 AM
![]()
![]()
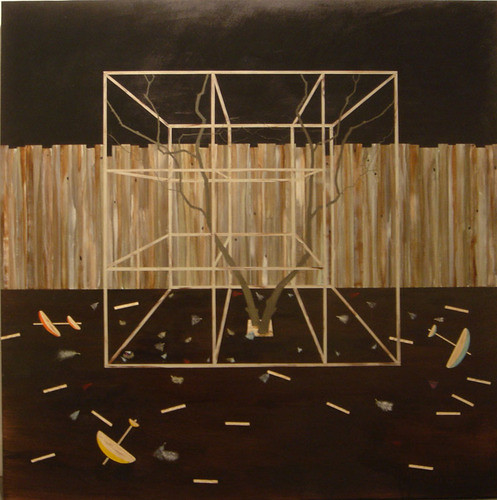
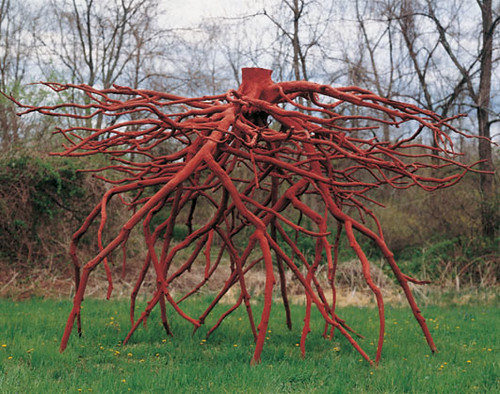
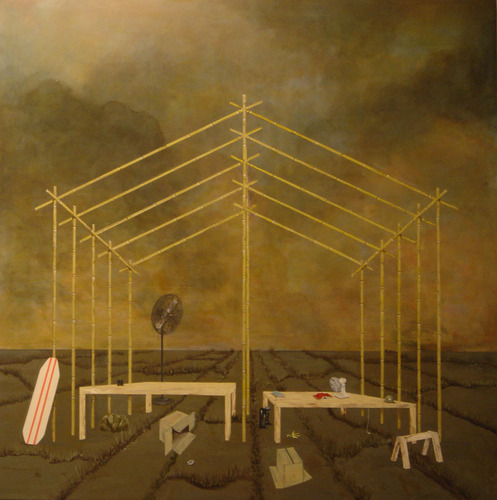 Last in my series of Culver City art is Echo Eggebrecht. Her work involves plenty of detail, balanced out by large amounts of open space. Beautiful and a tough thing to do. I want the first piece for my house - it's almost a backwards feeling of building a structure around the tree rather than from it! I might call her pieces modern surreal - as if Salvador Dali painted this today.
posted by Anonymous at 6:07 AM
![]()
![]()
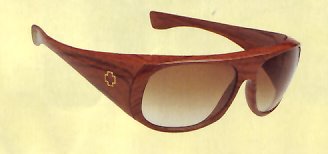 Even though summer is just around the corner, for us Angelenos, sunglasses are an everyday necessity. As seen in this month's Paper Magazine, Spy Optic is releasing a limted edition series of eyewear as part of their "woodstock" collection. The frame above is called the "hourglass" and is faux teak woodgrain! Unfortunately Spy Optic doesn't seem to have any info about it on their website, but there's more info in the "special advertising section: Design Directory" of Paper.
posted by jon at 5:00 AM
![]()
![]()
posted by jon at 2:40 PM
![]()
![]()
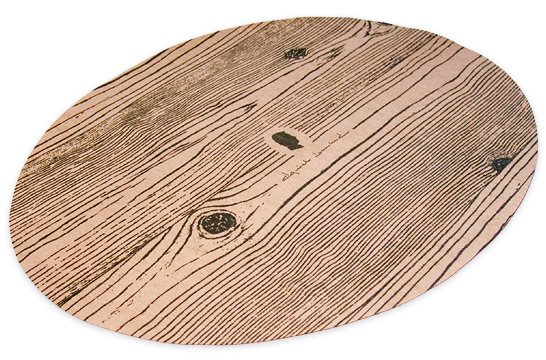

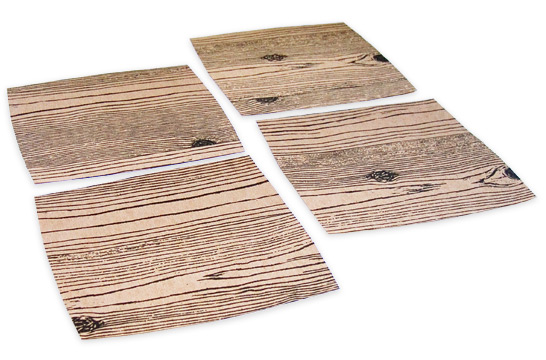 Blog friend and fellow woodnut Janel, over at Apartment Therapy Chicago, thought of us when she saw these placemats and doilies designed by Branch Design Office in Brooklyn. These were custom created for restauranteur David Boulud for the DB Brasserie in the Wynn Las Vegas. We are now on a mission to go there and see them for ourselves. Lovely! great job BDO! (thanks Janel!)
posted by jon at 8:04 AM
![]()
![]()


© 2005-2006

